The New Greenhouse Saga
The New Greenhouse Saga
The last storm back in January took out our mini-greenhouse, and with spring looming my wife was getting gloomy about how she would do at starting off fruit and veg seedlings this year. We're not adept gardeners, but we like to give it a go, and it's great when things grow well, and without some kind of greenhouse, that wasn't going to happen. We've had "proper" greenhouses before in previous houses, but not where we currently live - we've made do with those little plastic film and metal tube ones that are really more like a steamy tent. I recently saw an ad on Freegle for an aluminium greenhouse, but it had lots of missing glass, and I was concerned I might just end up being a waste collector for the donor, and have to skip it anyway, but it got us thinking about greenhouses.
Wifey found a really cheap one on Ebay - made with corrugated polycarbonate sheets instead of glass, but with an aluminium frame. After confirming we actually had some space for it, we decided to stump up the 200 quid for it. Now, with something this cheap, you just know you're going to have to do some reinforcement and "tweaking" but it should still cost a lot less than a regular price one.
I knew from previous experience that it's best to have a stable platform for a greenhouse, and not just plonk it down on bare soil, so I ordered a ton of sand, and 16 concrete slabs to form a base. I had to move our existing composter, and dig out a flower-bed, then rake the 2.4 metre square area flat. That alone took a weekend, but the weather was mostly kind to me. We have a lot of flint pebbles around our property that were put in by the previous owner, and are not really so decorative these days, so I used a few barrowfulls of them as a kind of hardcore to help level things off before I put the sand down. As I didn't want to hire a whacker compactor, I decided to use water instead as this is an easy way to achieve similar results, though obviously not as good. This is just a greenhouse base, so I'm not too concerned about a bit of movement.
 Sand patch ready for paving.
I made a wooden perimeter to keep the sand in and make it easier to level off before laying the slabs, but ended up having to tweak it after the fact when I'd laid 14 slabs and found the last ones didn't fit because I'd not put the perimeter together the way I'd planned and it was off square by about 2cm! After fixing that, I was able to get the last row done, and level off the slabs - fortunately, they didn't need too much. And, yet again, it is just a greenhouse base - and the cheapest of cheap slabs are not really pretty enough to bother making too much fuss over.
Building up the greenhouse was mainly uneventful, apart from initial difficulties finding the instructions. I've heard that these instructions are a bit lacking - and they aren't the clearest - but I didn't find them too bad. Some of the Chinese-to-English translations were quite amusing though, and some parts took a bit of squinting at to work out what the diagrams were trying to convey. One thing I found I had to watch out for was that although they had drawings of the parts required for each step, the apparent dimensions were often way different from reality, with what looked like short metal poles looking substantially larger in real life! They basically guide you through building the sliding door and window first, then the front and back, then the side sections, and finally putting it all together. The steel base comes in a separate box, but does not have separate instructions. The diagrams of the corner angle brackets are way off, and talk about burying them in the ground, which you wonder how you will do just looking at the diagram. It's not until you see them IRL that you realise that they are basically stakes that you are supposed to drive 20cm into the ground. This was obviously not going to work with my newly laid slab patch, so I had to hacksaw them down to just the width of the base. I now have 4 20cm chunks of steel L section spare. I had always planned to screw this base to the slabs anyway, so this was no real problem. I laid the base out on the slabs, and drilled 8 6mm holes near the corners and then drilled corresponding 5mm holes into the slabs using an SDS drill my dad gave me a few years ago. I decided to use some concrete screws I had lying round to tie the base down, as I was worried that wall plugs might crack the slabs over time due to their expansion forces.
Attaching the greenhouse frame (without the plastic panels in) was surprisingly easy - it's just a bit precarious until you can get a few of the metal ties on and it stops being slidey. Once in place, I then went round and properly tightened up all the nuts and bolts with a 'leccy drill. Next was the task of fitting the door and window, and then the polycarbonate panels. A bag of stainless steel wire spring clips is provided, which are a bit of a pain to put in, especially when you're a short-arse like me who can't properly reach the ones near the apex of the greenhouse roof! I was also a little concerned that the panels were rather loose under the clips, and there didn't seem to be a way to make them more snug. Anyway, I managed to get the panels in just before it started getting dark, and gave myself a pat on the back, and a cup of earl grey tea as a reward.
 The greenhouse assembled.
Next morning, looking out of the bedroom window, the greenhouse was still there, so I was even more pleased with myself! However, just as I was finishing up my morning coffee, the doorbell went, and it was one of our neighbours, to tell us that one of the "glass" panels was lying in the lane just the other side of our fence. I retrieved it and on inspection, I could see that because the panels are fairly flexible, they could deform enough with a minor gust of wind to make them too narrow for the clips to retain them. This is the cause of one of those foreshadowed "reinforcements" mentioned above...
I thought about packing out the clips somehow, but whatever I did, I would have to do about 150 times - once for each clip, and it would still allow the panels to deform in the wind and come out. I also thought about just screwing all the panels in, but I was worried that I'd damage them, and a strong gust could just rip them off. In the end, I decided to use a reel of galvanised steel gardener's wire I'd had floating round in a workshop drawer for years. I drilled holes in the frame for the wire to pass through, outside the plastic panels, as a kind of "retaining strap" across the vertical middle, and about 5cm from the ends of each panel. I pulled the wire "finger tight" and secured it by just winding the tail end back around the wire - steel gardener's wire is nice and soft, so this is easy to do. It took about two hours, to do, but the result is that now, none of the panels can easily distort enough to come out, and, well, they're held in by the wire anyway. Time will tell if this is proof against gales, but I'm quietly confident. This has been in place for a few days, and we have had a few strongish gusts of wind, and nothing has come loose, so I guess that's a win!
 Greenhouse corner showing retaining wires.
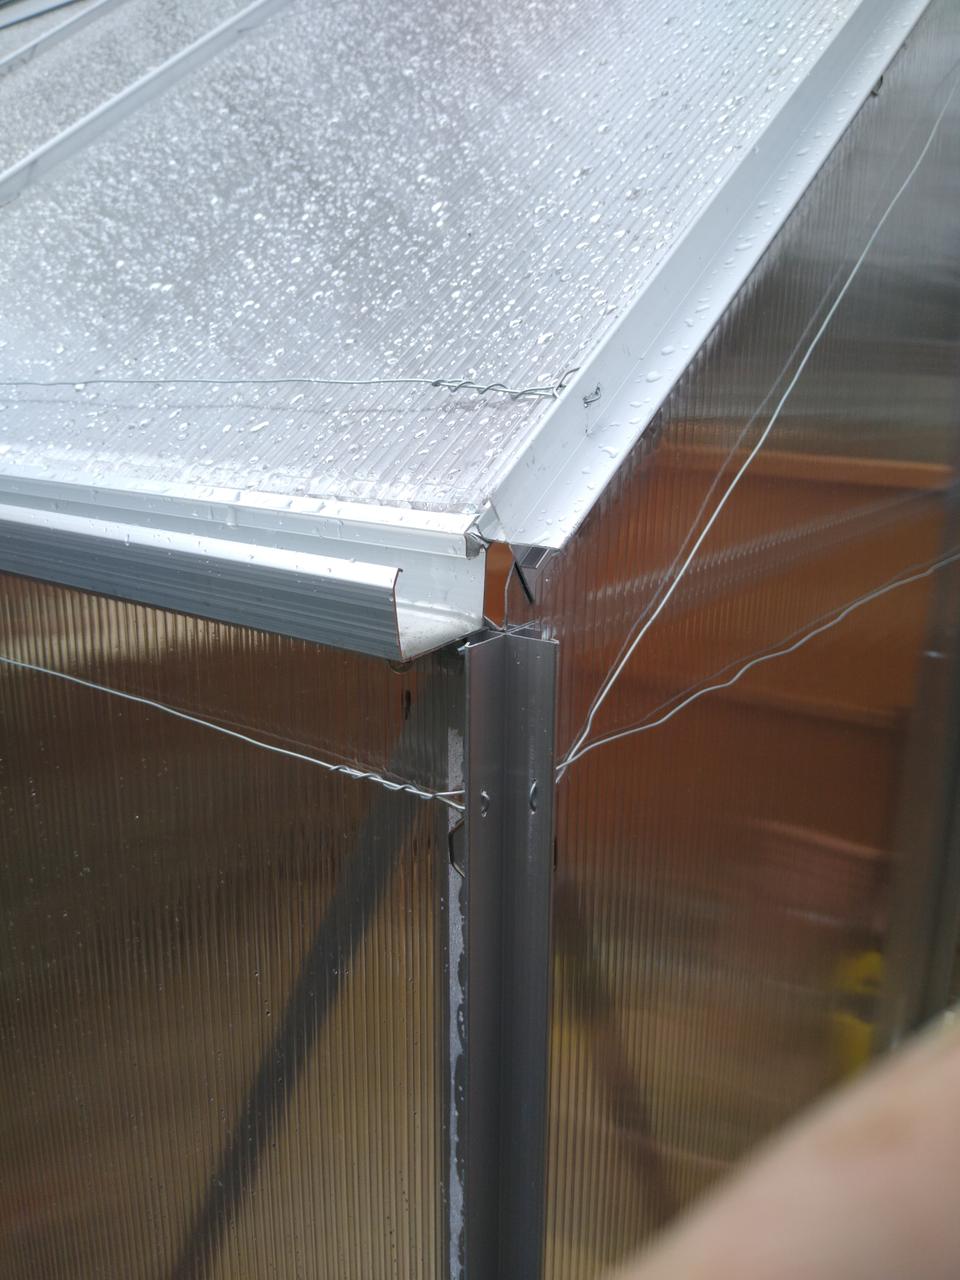 Close-up of greenhouse corner showing retaining wires.
The final challenge was the sliding door - it had no end-stops on the rails, nor any kind of catch to keep it closed, so the wind would blow it back and forth constantly. The problem was, I couldn't see anywhere I could put a catch easily, so in the end, I decided to go with a home-made magnetic contraption instead! I have a carrier bag of powerful neodymium magnets that were removed from old "spinning rust" hard disk drives, that I have found multiple uses for over the years. I used a piece of scrap aluminium to fashion a "holder" for one of these flat, curved magnets, so I could attach it to the leading edge of the door, near the bottom. I used a 50mm length of the angle section I had earlier cut off the base corner brackets that were meant to form the "stakes" I didn't end up using. The plan was to attach it to the front of the base rail of the greenhouse frame with a corner brace L bracket. During this process, however, whilst drilling holes for the self-tapping screws to hold it on, the drill-bit shattered, and I ended up slicing through the fingernail of my left index finger, which delayed things a bit as I rushed inside to get my wife to patch me up whilst cursing loudly and being a squeamish crybaby as it was bleeding quite freely for the tiny wound I had incurred.
 Partially healed damaged fingernail.
I persisted through the pain and blood though, and managed to complete the magnetic catch despite everything. Up until this point, I thought I was doing rather well not to have injured myself during the digging, slab laying, and assembly of the rather sharp aluminium greenhouse frame. I guess I kind of brought it on myself then. Smugness never pays off. Anyway, the finger is healing up quite well, thanks...
 Greenouse door magnetic catch - closed.
 Greenouse door magnetic catch - open.
Well, that's not the end of the saga, though! It nearly is, but not quite. My final task, before my wife takes over management of the greenhouse, is to make some "furniture" for it - to wit, a "potting table" and a growing rack. She'd foolishly already told friends that I would build her these out of recycled pallet-wood, so I thought I'd better not let her down on this. I had considered picking up a set of utility tables I saw in Lidl last week, but at fifty quid, I thought better of it, and I still do have a lot of pallet-wood on hand, in particular, a whole pallet I've had in the workshop for months from a delivery way back in November.
After attacking it with a hammer and crowbar for about half an hour, I had managed to disassemble it without too much splitting of the wood, and I had a pile of planks enough to make the potting table. After consulting with the major stakeholder in the project - my wife - I had my project scope: about waist-height like the kitchen worktops, no gaps between the slats on top, and about as deep as a bag of compost. I had to add a couple of chunkier 30x70mm "beams" from the wood pile, and set to with the mitre saw to cut the planks to size and trim off a few split ends. I arranged the top planks on the two beam sections, and used some 60x5mm wood screws to join them to the beams, then screwed on the four leg slats, followed by three pieces at the base of the legs to stabilise the structure. All in all, that took about an hour, and I now have this:
 Pallet-wood potting table.
Next up is the growing rack. For this, I used an old pallet of a different style, which has seven horizontal slats attached to two beans. I just cut this in half width-wise, forming two pieces one of four slats, and another of three. Then I pulled some more slats from the wood-pile to form the legs, making this:
 Pallet-wood growing rack.
Now it's over to my wife to wield her green-fingered magic and conjure up some nice tomatoes and veg over the summer!