3D Printed Toothbrush Holders Update 1
3D Printed Toothbrush Holders Update 1
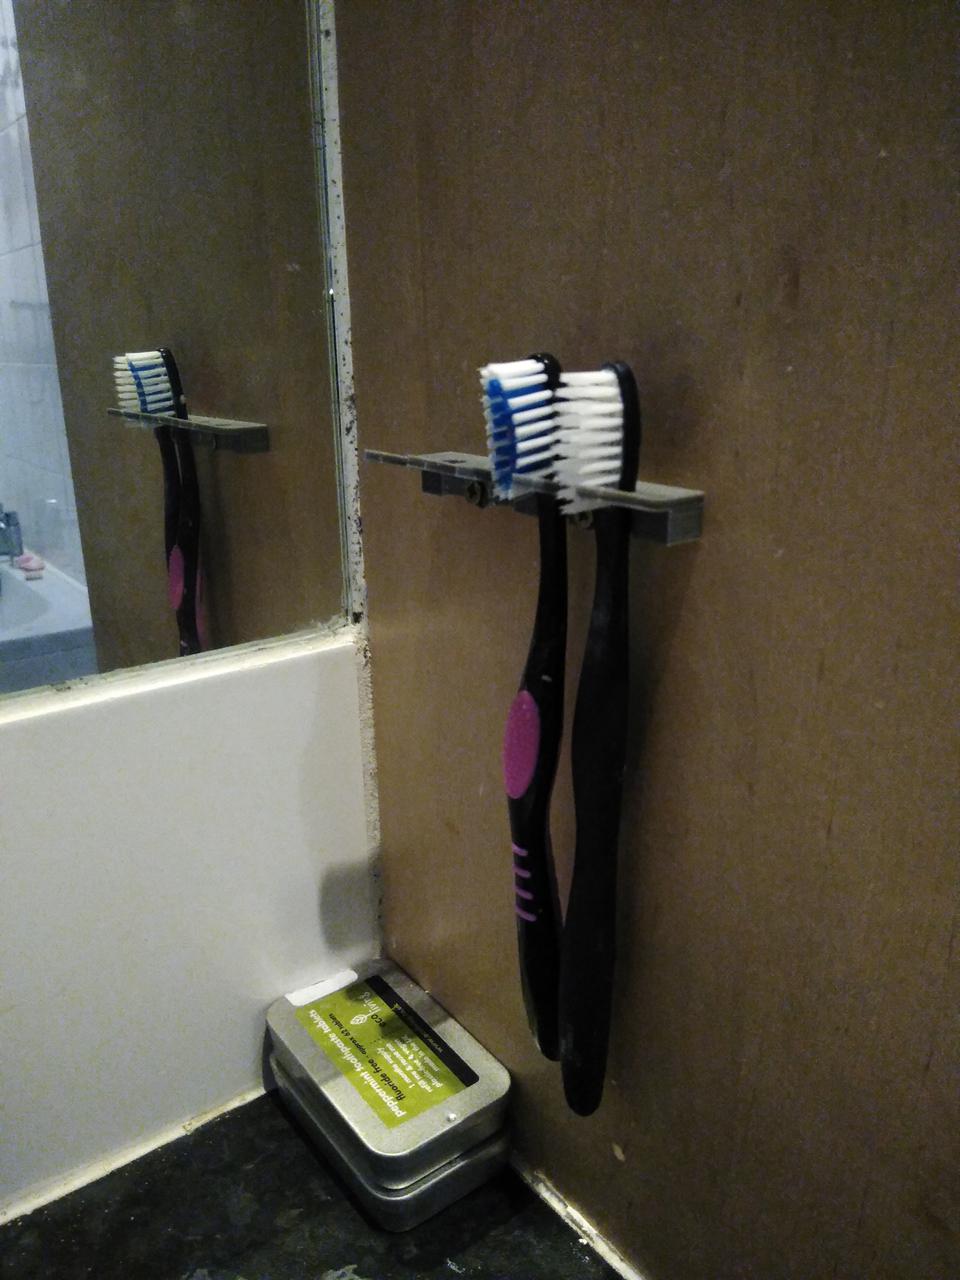
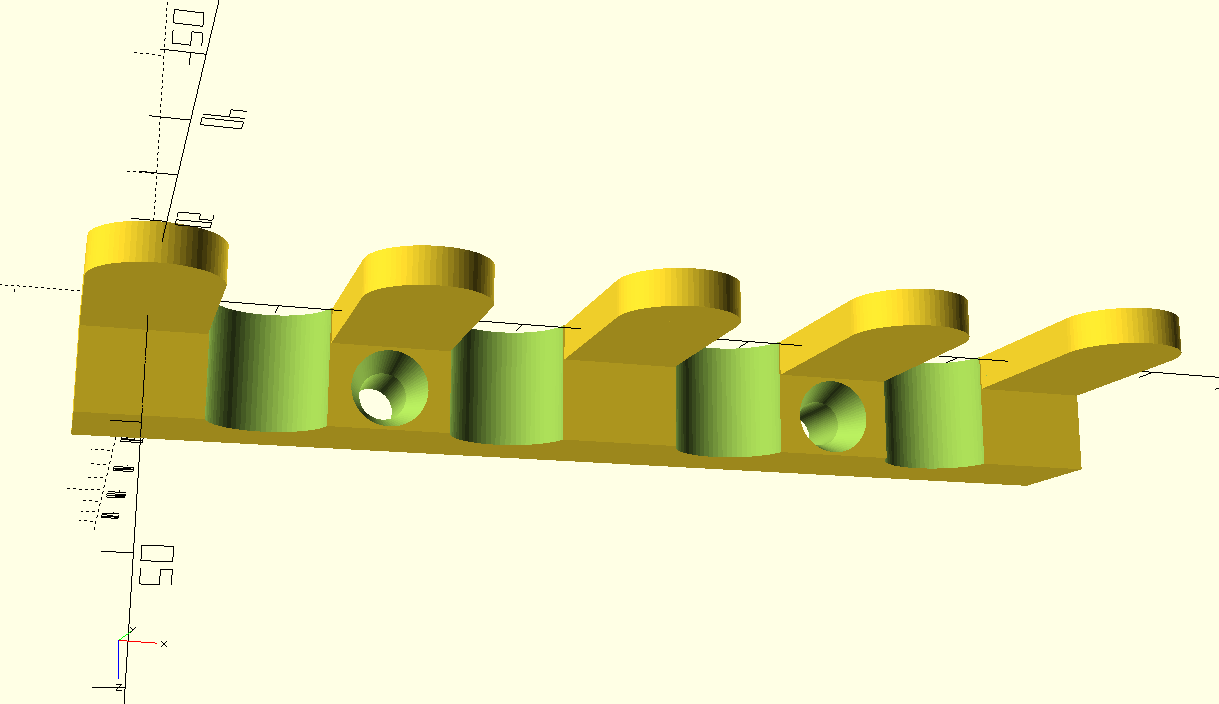
The thing I love about 3D printing is that you can take an existing design, and customise it for other contexts. That's lucky, because after I fitted the two brush holder in our en-suite bathroom, my wife said "so, are you going to print one for the boys?" (referring to our two youngest, 11 and 13 year-olds). After a bit of back and forth, it was decided that we really needed room for four toothbrushes for when big sisters are back from University. It took about 10 minutes to rearrange the design - I decided that I still only needed two screw holes, as toothbrushes aren't exactly heavy, but I added an extra two prongs, and extended the base and thought I'd run it off on the printer presently.
An overly long yarn about 3D-printer maintenance and my questionable engineering practices
Not that it's sentient or anything (as far as I know anyway) but the 3D printer had other ideas. It's been acting up a bit recently, and I've been having trouble with "longer" prints failing due to under-extrusion and nozzle blockages, after about half an hour. A lot of my prints are really quick, but this one went over the nominal "about half an hour" threshold by about 45 minutes, and the printer refused to print it. Well, more precisely, it started "clicking" and failed after about half an hour with a clog. The clicking is caused by the filament recoiling when the extruder motor is unable to drive it through the nozzle - the tension reaches a point where it exceeds the friction on the knurled drive wheel, and the pressure is released by the filament slipping back a few millimetres. This is usually caused by the filament melting in the throat of the nozzle, and once liquid, no more filament can go in, because "you can't compress a liquid" and only a certain amount of pressure relief is caused by whatever is coming out of the nozzle by force of gravity. One of the most likely causes of clogs and under-extrusion after a set period of printing OK is problems with the heat-break heatsink, so I did some basic trouble-shooting, and cleaned out the vanes of the heat-break heatsink and tried again, with the same result. I pulled the teflon Bowden tube out of the push-fit joints, and trimmed a few centimetres off the end, in case it was that. Next print, same result - brittle, underextruded layers after about half an hour through the print; parody infill, and a top skin with holes and voids all over. I even modified the print to take less time - reducing the depth of the mounting block by 5mm, but the subsequent test print also failed in the same fashion. I went to bed as it was way past midnight by then.
A few days later, I decided to try some deeper trouble-shooting, and got out the laser thermometer. 43 degrees C at the top of the heatsink shouldn't be a problem (though it's a bit high). I was mesmerised (as usual) watching it print, when I noticed the hot-end heating element cartridge seemed to be poking a bit far out of the head block... a gentle prod confirmed that it was loose. Now that could be a problem - if it is loose, heat transfer to the block won't be optimal. After stopping the print, and positioning the head where I could get an Allen key into the grub screw that holds the element in place, I tried tightening it. However, no matter how much I tightened it, it didn't seem to grip, and thining I might be being a little too gentle, I applied some more elbow-grease, and stripped the head of the grub screw. Sigh.
At this point, "the boys" were getting ready for bed, so a little multi-tasking was called for, policing the usual bed-time chaos and petty squabbling they usually get up to. Just as well that the 3D printer is in a room between the bathroom and their bedrooms on the landing. All that was required was the odd growl and brandishing of a screwdriver in their general direction.
Anyway, fortunately, I have some spare 3D printer parts, including the original, leaky hot-end that the printer came with. After confirming I had a spare grub screw of the right size - a tiny - M2 x 3mm one - I got out the torx driver set in the hope I might be able to extract it. The advantage of using a torx driver is that it can often grip a similarly sized hex head better when it's damaged, but this time it didn't. A few more curses later, I broke out the micro-socket set, which has a very large number of weird bits. I tried a few five-stars, and a few torx sizes again, but surprisingly, it was a hex bit that fit well enough to get the grub screw out. Replacement grub-screw fitted, and it even gripped the heating element properly!
I'm missing out a lot of the finer details here, as it was quite a game to get this done, but done it was. I should have taken some pics of the process, but unfortunately I only thought of that afterwards. Probably be boring anyway.
Another test print, and the clicking it back :-( and I can see the infill is not forming properly - just wispy strands. Print cancelled, build bed scraped off for the umpteenth time, and back to head-scratching. The cat decided to come in at this point and lend a paw, but quickly got ejected when he changed the subject to that of food. I mulled the problem over while I took kitty boy downstairs to remind him where his half-eaten bowl of food was.
Eventually, I decided to slow the printer down - it's easy to do, you just lower the feed rate, and the printer head starts moving slower. I cranked it back to 90%, and this seemed to get rid of the clicking when printing the skin, but not the infill, and the infill was still wispy. Now, the filament I'm using is new to me - given to me by me old dad, in fact, and it doesn't have a recommended temperature anywhere on the packaging. It's PLA, so it should work at 200 degrees, but some like it hotter. I whacked it up to 210 degrees, and the clicking went away entirely, and extrusion is coming out fine. The print continued to run on for 54 minutes, but it finished without any issues. The infill was still iffy, but not too bad, the skin was acceptable. Phew!
So this is what I ended up with: