Trying out Nikola Update 1
Trying out Nikola Update 1
It's been a couple of weeks now, since I started "trying out Nikola", so I thought I'd do an update. As I've worked through getting the site set out the way I want, I've learnt quite a few things about Nikola, and hosting it on my RPi 4. The mere fact that I've stuck with it so far probably means that it can do all the things I need it to. Here are a few observations on that process:
1. Speed
There are three factors here - speed of setting up, speed of getting posts up, and speed of serving the site.
Getting Nikola set up isn't really that hard, and doesn't take that long, but it's a bit more involved than just downloading and installing a package. There was a fair bit of Linux command-line (CLI) action here: installing required Linux packages with "apt get"; then installing the required Python libraries with pip; then configuring Nikola, and a web server; and finally getting the web-server accessible to the outside world. These parts, spread unevenly over the past 19 days, have been by far the most time-consuming part, however, I feel that's par for the course. Even if I'd gone for a less "technical" web-publishing system, I'd still have had to do the operational bits if I wanted to host it on my own broadband - which I very much do.
Getting posts up is not as user friendly as using a dynamic web publishing platform like WordPress or Wix, but it is pretty simple and quick, because I'm pretty comfortable with the CLI. I'm sure I could use a GUI editor to create the raw posts if I wanted, but at the moment, I don't feel a need for that. My workflow currently looks mostly like this:
- Run "nikola new_post -e posts/
.md - Type in the title, then after the "vim" editor launches...
- Edit the metadata header, this (for this post, see below)
- Type the post body as Markdown formatted text (or one of many other text-based formats)
- Run "nikola build"
- Run "nikola deploy"
- If revisions are required (they usually are), edit the post with vim, and go back to step 5.
The metadata block from step 5 looks like this:
<!--
 .. title: Trying out Nikola Update 1
 .. slug: trying-out-nikola-update1
 .. date: 2024-01-18 13:13:54 UTC
 .. tags: Linux,Project,RaspberryPi,WebTech,Updates
 .. category: Trying out Nikola
 .. link:
 .. description:
 .. type: text
-->
Because I'm a bit lazy, I decided that the "deploy" step would be superfluous if I just served the content directly from the "output" sub-directory of where my blog sits. Because of my setup, deploying actually would just copy it somewhere else on the same volume, and I can't see any reason that I should do that. This step is supposed to be used where Nikola resides on a different computer to the web server, and mine doesn't. I may come back to that later - perhaps by running Nikola on my laptop, and not on the RPi, but that's for another day.
The speed of serving the site was a big surprise. I've worked with lots of dynamic web publishing systems in the past, as well as quite a few static ones, so I should have seen this one coming really. Bearing in mind that it's a static site, served by "lighttpd" (Lighty to their friends) running on a lowly Raspberry Pi 4, and is currently connected to my WiFI, not on Ethernet, the site is shockingly fast. I would have been happy with "as fast as a free online blogging system", but the page render times I'm seeing would make most e-commerce site admins (which I used to be) envious. The bottleneck it seems is entirely my broadband, but even then, it's not making a big impact. It will probably slow down a bit when I work out how to remove dependencies on the Google Fonts API, but still.
2. Theme
Theming is relatively easy, and yet again, quite CLI-intensive. The docs for theming Nikola are a bit spread out, but there is information out there. Hacking an existing theme is fine if you can find one that you like as it is, or can mould into what you want. I chose the latter - the Nikola site, https://getnikola.com/ has a nice gallery here: https://themes.getnikola.com/ where you can view examples of free themes full of Lorem Ipsum text. I ended up choosing the "gruberwine" theme because I liked the aesthetics - taste isn't universal, and I can't explain it more than that! To do this, you just have to install the theme (on the CLI) and then enable it in your site's conf.py file. There's not much to configure at this stage.
3. Operations
Making the site accessible on the Internet was in roughtly three phases:
First, I had to configure my router to forward web traffic to the web server. For some reason, I still have to have port 80 (HTTP) open, even though I'm serving everything over 443 (HTTPS). It's partly to do with the Letsencrypt setup, and I would much rather not have port 80 ope at all. This is quite easy on most modern-ish broadband routers - you just have to find the right part of the admin menu.
Secondly, I had to set up a dynamic DNS provider, so I can have a "real" domain name, rather than just an IP address, which periodically changes when my ISP decides. I opted for dynu.com who still offer really free dynamic DNS. After a significant time pondering what to call the site, I ended up with makerpunkbuzz.mywire.org... not perfect, but in the end, I didn't want to spend forever deciding, and it had already taken too long! Anyway, once decided, and registered, I had to set up an agent on the RPi to keep the address updated. This takes the form of installing and configuring DDClient from the Debian repository. Very straight-forward, but obviously, a with a little CLI fun thrown in.
Finally, to enable proper HTTPS, or encrypted HTTP, I opted for Letsencrypt. This was a bit annoying, but ultimately Letsencrypt have to choose a way of packaging which works best for them, but why they chose "snap" packages I don't know. This mainly involved working out how to install the snap software on Debian, just so I could install Letsencrypt's certbot. Certbot is a great system, which automates all the admin required for setting up and maintaining the TLS digital certificates. Once done, however, it should basically run itself.
For day-to-day operations, I've ended up doing a fair bit of tweaking, and most of what I've done was to do with the Nikola theme - minor adjustments to the CSS styling like adding in the handwriting-style font, called RockSalt, and the layout, and learning how to do some things with the templating. I'm not super-hot on CSS, but I can find my way with lots of "goggling" (not a smelling pistake!) and reading of blog posts, w3c docs, stackoverflow questions and so on. I don't remember the exact details, but I eventually got everything the way I want it. It's not going to win any awards, but it seems OK to me ;-)
I've also added quite a few "comfort" features to the command-line environment, like the mosh shell (so I can keep SSH sessions to the RPi going even if I hybernate my main laptop); command-line utilities not installed by default on Dietpi; tweaking my .vimrc so it's not annoying when pasting text from the clipboard; and configuring the access log on Lighty so I can see which pages are being viewed but not much else.
I wanted to enable some basic request logging, without storing any tracking data or personal information like IP addresses, and in doing so, I came up against some quirks of Dietpi, the RPi OS I'm using; I had to write a little script to save Lighty's logfile to the main flash storage, because Dietpi, by default, stores server logs in a RAMdisk for better webserver performance, and to save wear on the flash. Because RAM is quite limited, it then clears the logs at 17 minutes past each hour, meaning there is no permanent record of the requests beyond an hour old. You can "tail" Lighty's access.log file to see what requests are coming in, but it keeps saying "file truncated" every hour, because the contents have been wiped by this hourly maintenance script. As I want a longer-term record of which pages are being read, I had to come up with a proper solution. What I have ended up doing is writing a little "one liner" script to run just before Dietpi's script (in /etc/cron.hourly) which appends the current log onto a backup file, so they don't get lost. This will obviously cause more wear on the flash, but it will be a small fraction of what it would have been if I changed Lighty to log directly to flash, and I'm aware there's a race condition here that could result in the loss of any requests logged between when my script runs, and when the cleanup script runs, but I'm comfortable with the very low risk. Anyway, after running this arrangement for a few days, and getting so much junk logged from drive-by exploit attempts, I've now evolved the script to only log the successful requests, and store the backup log compressed with gzip. I feel this strikes a decent balance between flash wear and my ability to see what's going on.
It does complicate seeing requests for the current day, however, because up to an hour's worth of logs will still be in the RAMdisk. That's easy enough to cope with though, and I now have a nice BASH shell one-liner that summarises requests since midnight, so I can see if anyone is actually reading what I'm writing... Sweet.
4. Hacking scans
One thing that I had largely forgotten about since giving up doing Linux admin for a living, was how utterly hostile the open web is. I decided I'd enable limited logging on Lighty (lighttpd) so I could see if anyone was actually reading my posts. By limited, I mean I log just the time of each request, the response code, response size, HTTP verb and the URI requested, so nothing that identifies viewers. What shocked me most was that on many days, drive-by scans by hacker scripts were by far the most frequent requests made. I think this is mainly because of port 80 being open, which I think is just for Letsencrypt - this is definitely something I'll be looking at further. It's a fearful world out there, especially on the "Tinkernet".
3D Printed Toothbrush Holders Update 1
3D Printed Toothbrush Holders Update 1
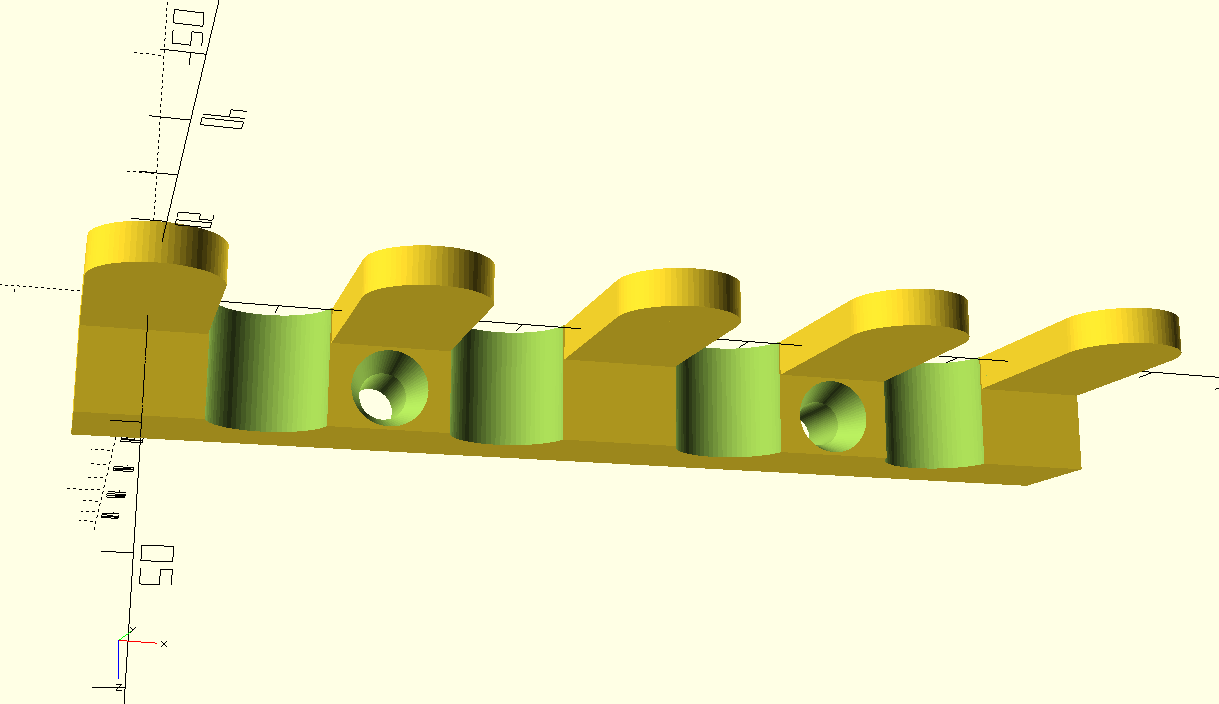
The thing I love about 3D printing is that you can take an existing design, and customise it for other contexts. That's lucky, because after I fitted the two brush holder in our en-suite bathroom, my wife said "so, are you going to print one for the boys?" (referring to our two youngest, 11 and 13 year-olds). After a bit of back and forth, it was decided that we really needed room for four toothbrushes for when big sisters are back from University. It took about 10 minutes to rearrange the design - I decided that I still only needed two screw holes, as toothbrushes aren't exactly heavy, but I added an extra two prongs, and extended the base and thought I'd run it off on the printer presently.
An overly long yarn about 3D-printer maintenance and my questionable engineering practices
Not that it's sentient or anything (as far as I know anyway) but the 3D printer had other ideas. It's been acting up a bit recently, and I've been having trouble with "longer" prints failing due to under-extrusion and nozzle blockages, after about half an hour. A lot of my prints are really quick, but this one went over the nominal "about half an hour" threshold by about 45 minutes, and the printer refused to print it. Well, more precisely, it started "clicking" and failed after about half an hour with a clog. The clicking is caused by the filament recoiling when the extruder motor is unable to drive it through the nozzle - the tension reaches a point where it exceeds the friction on the knurled drive wheel, and the pressure is released by the filament slipping back a few millimetres. This is usually caused by the filament melting in the throat of the nozzle, and once liquid, no more filament can go in, because "you can't compress a liquid" and only a certain amount of pressure relief is caused by whatever is coming out of the nozzle by force of gravity. One of the most likely causes of clogs and under-extrusion after a set period of printing OK is problems with the heat-break heatsink, so I did some basic trouble-shooting, and cleaned out the vanes of the heat-break heatsink and tried again, with the same result. I pulled the teflon Bowden tube out of the push-fit joints, and trimmed a few centimetres off the end, in case it was that. Next print, same result - brittle, underextruded layers after about half an hour through the print; parody infill, and a top skin with holes and voids all over. I even modified the print to take less time - reducing the depth of the mounting block by 5mm, but the subsequent test print also failed in the same fashion. I went to bed as it was way past midnight by then.
A few days later, I decided to try some deeper trouble-shooting, and got out the laser thermometer. 43 degrees C at the top of the heatsink shouldn't be a problem (though it's a bit high). I was mesmerised (as usual) watching it print, when I noticed the hot-end heating element cartridge seemed to be poking a bit far out of the head block... a gentle prod confirmed that it was loose. Now that could be a problem - if it is loose, heat transfer to the block won't be optimal. After stopping the print, and positioning the head where I could get an Allen key into the grub screw that holds the element in place, I tried tightening it. However, no matter how much I tightened it, it didn't seem to grip, and thining I might be being a little too gentle, I applied some more elbow-grease, and stripped the head of the grub screw. Sigh.
At this point, "the boys" were getting ready for bed, so a little multi-tasking was called for, policing the usual bed-time chaos and petty squabbling they usually get up to. Just as well that the 3D printer is in a room between the bathroom and their bedrooms on the landing. All that was required was the odd growl and brandishing of a screwdriver in their general direction.
Anyway, fortunately, I have some spare 3D printer parts, including the original, leaky hot-end that the printer came with. After confirming I had a spare grub screw of the right size - a tiny - M2 x 3mm one - I got out the torx driver set in the hope I might be able to extract it. The advantage of using a torx driver is that it can often grip a similarly sized hex head better when it's damaged, but this time it didn't. A few more curses later, I broke out the micro-socket set, which has a very large number of weird bits. I tried a few five-stars, and a few torx sizes again, but surprisingly, it was a hex bit that fit well enough to get the grub screw out. Replacement grub-screw fitted, and it even gripped the heating element properly!
I'm missing out a lot of the finer details here, as it was quite a game to get this done, but done it was. I should have taken some pics of the process, but unfortunately I only thought of that afterwards. Probably be boring anyway.
Another test print, and the clicking it back :-( and I can see the infill is not forming properly - just wispy strands. Print cancelled, build bed scraped off for the umpteenth time, and back to head-scratching. The cat decided to come in at this point and lend a paw, but quickly got ejected when he changed the subject to that of food. I mulled the problem over while I took kitty boy downstairs to remind him where his half-eaten bowl of food was.
Eventually, I decided to slow the printer down - it's easy to do, you just lower the feed rate, and the printer head starts moving slower. I cranked it back to 90%, and this seemed to get rid of the clicking when printing the skin, but not the infill, and the infill was still wispy. Now, the filament I'm using is new to me - given to me by me old dad, in fact, and it doesn't have a recommended temperature anywhere on the packaging. It's PLA, so it should work at 200 degrees, but some like it hotter. I whacked it up to 210 degrees, and the clicking went away entirely, and extrusion is coming out fine. The print continued to run on for 54 minutes, but it finished without any issues. The infill was still iffy, but not too bad, the skin was acceptable. Phew!
So this is what I ended up with:
3D-Printed Toothbrush Holders
3D-Printed Toothbrush Holders
Buying suction cup mounted toothbrush holders is hard, apparently.
Back in late December, during the seasonal buying frenzy, my wife searched *.Bargain stores and even some more illustrious outlets, fruitlessly, for a suction-cup mounted a toothbrush holder for her youngest child (my step-they) who is away at University. They're in halls of residence, and can't put up more firmly mounted furniture. Eventually, my wife bought a suction-cup mounted wire basket toiletries holder, but it didn't have a toothbrush holder.
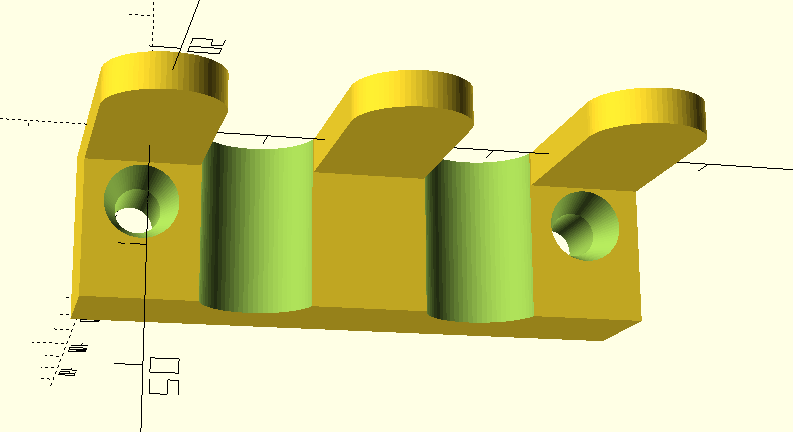
In a rare show of confidence in my design abilities, my wife asked me if I could design something to fit, instead. Of course, busy as I was in my own retail frenzy, I couldn't resist the challenge. So armed with my trusty Vernier calipers, took some measurements, and sketched some ideas up. Then, I hit the OpenSCAD hard, and eventually came up with this:

You can download the OpenSCAD code for this if you're interested, here: wire-basket-toothbrush-holder.scad
The mounting block clips over the rim of the wire basket of the toiletries holder. I had to make vertical grooves in the mounting block, spaced the same as the wires of the basket. Naturally, these are not that evenly spaced, so there's a bit of allowance for that. I eventually added more grooves halfway between, so that it can be mounted half a width right or left. There are also some holes horizontally through the block from front to back, that allow a cable tie to be fed through to stop it popping off. The prongs of the toothbrush holder are flat, but these are intended to be bent upwards manually after printing (after softening in hot water) to help keep the toothbrushes "on the hook". Obviously, there were a number of iterations and test prints. Just to make things a little bit more spicy, my 3D printer started to clog up and fail prints during this process - a problem I have not yet managed to get to the bottom of :-(
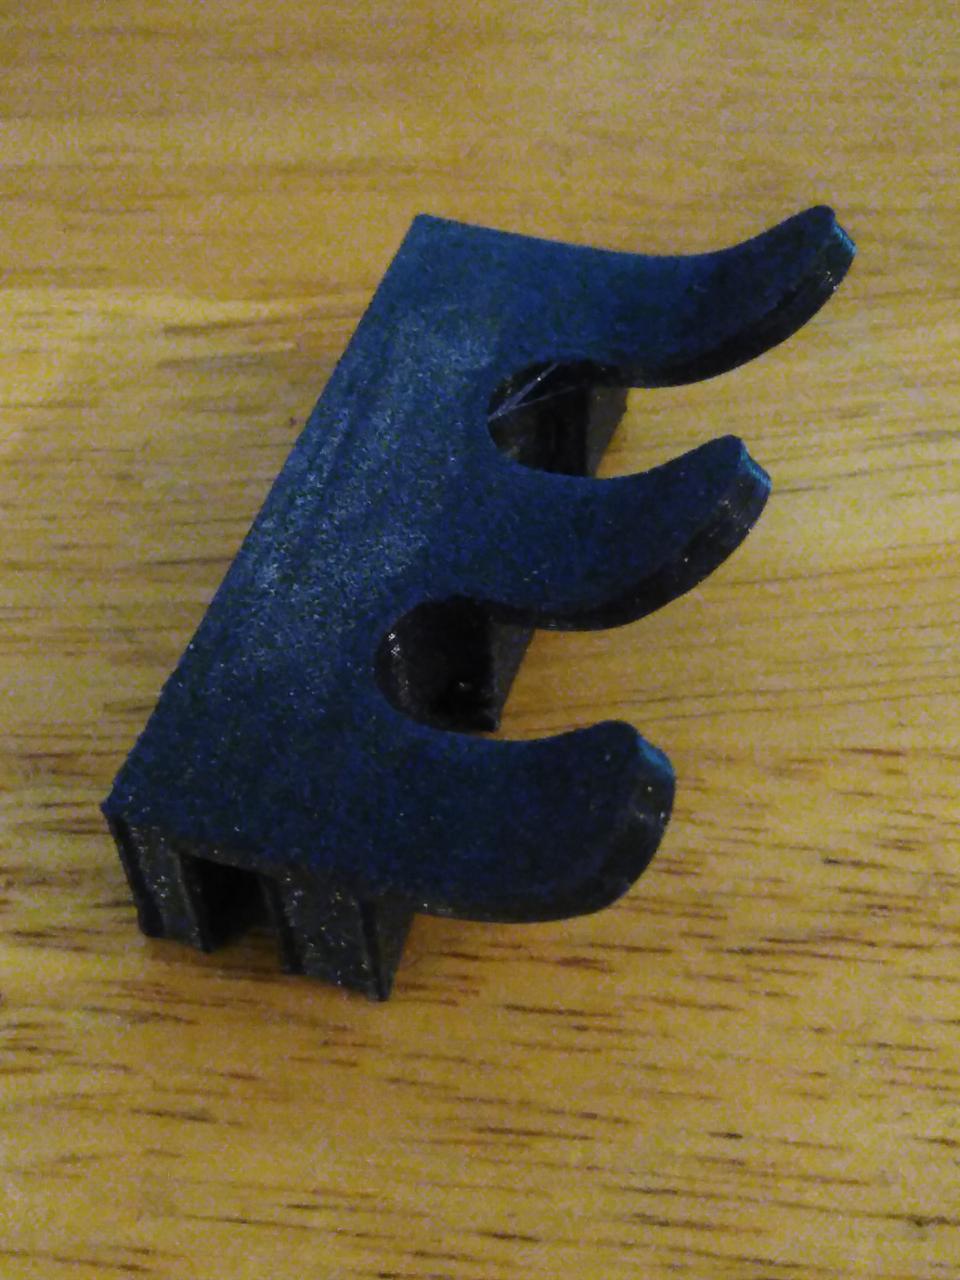
Anyway, it seems it went down well enough. I'll see if I can get a photo of it in use, to put up here. In the mean time, here's one of the "iterations" out of my trash PLA bin:
Of course, I wouldn't have entitled this post "3D-Printed Toothbrush Holders" in the plural if the yarn ended there...
So, inevitaby, my wife eventually asked if I could print one for our bathroom, as we've been using an old glass to hold our toothbrushes for ages - ever since I made our upcycled pallet-wood bathroom mirror unit, back in the second COVID-19 lockdown. Well, it's definitely not a wire-basket, so the original one won't cut it here.
One of the things I most like about OpenSCAD is that it's so easy to refactor old designs to account for new uses. So I made a few adjustments: I removed all the bits that were to do with clipping onto the wire, basket, made the block 5mm narrower, moved the holes that were for the cable tie, closer to the edge and up 5 mm or so, and finally, added a countersink to them too:
Of course, the OpenSCAD code for this is also available for download, here: screw-on-toothbrush-holder.scad
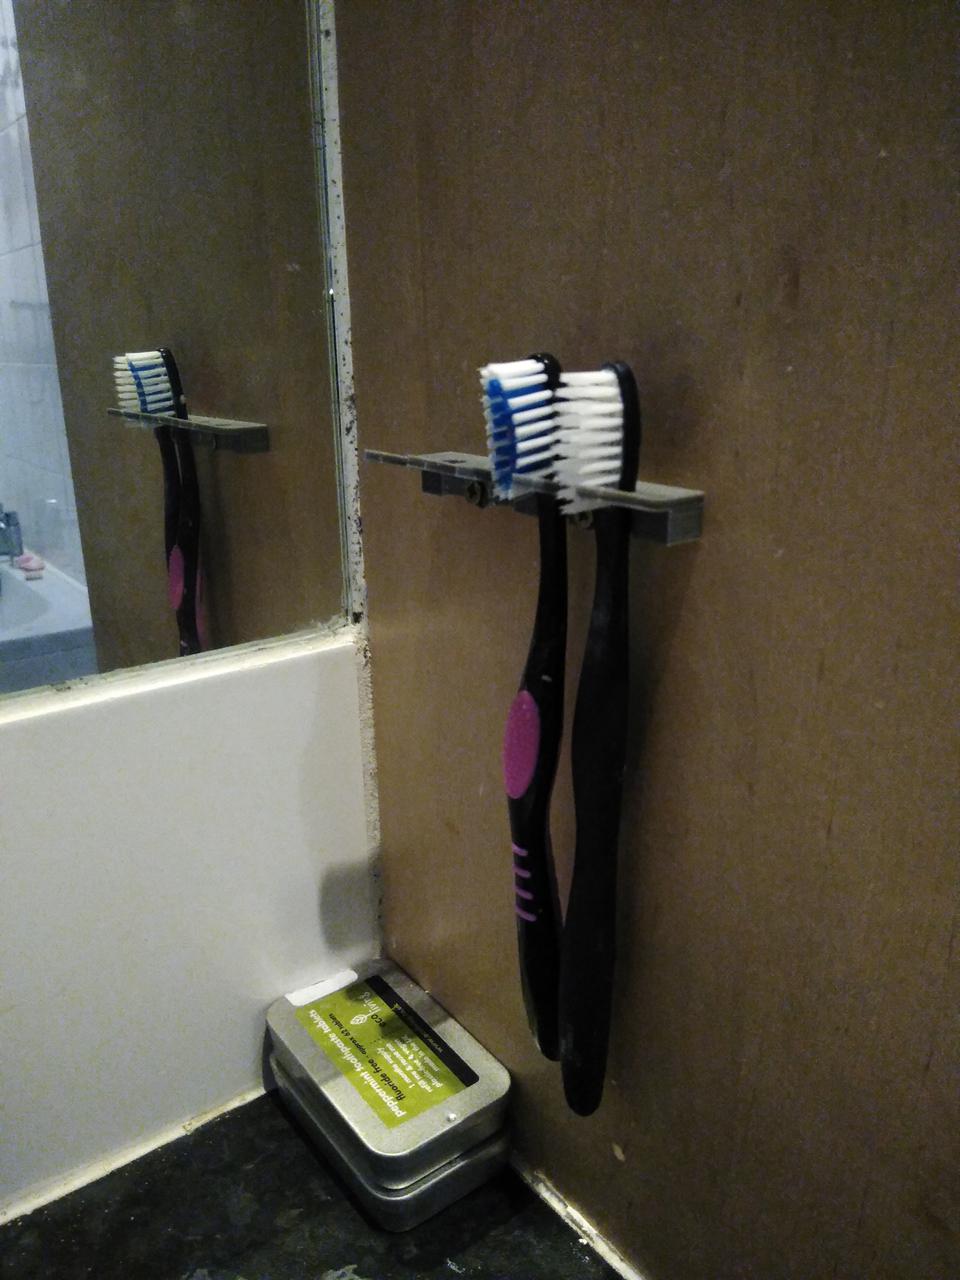
Just for completeness, here it is in place:
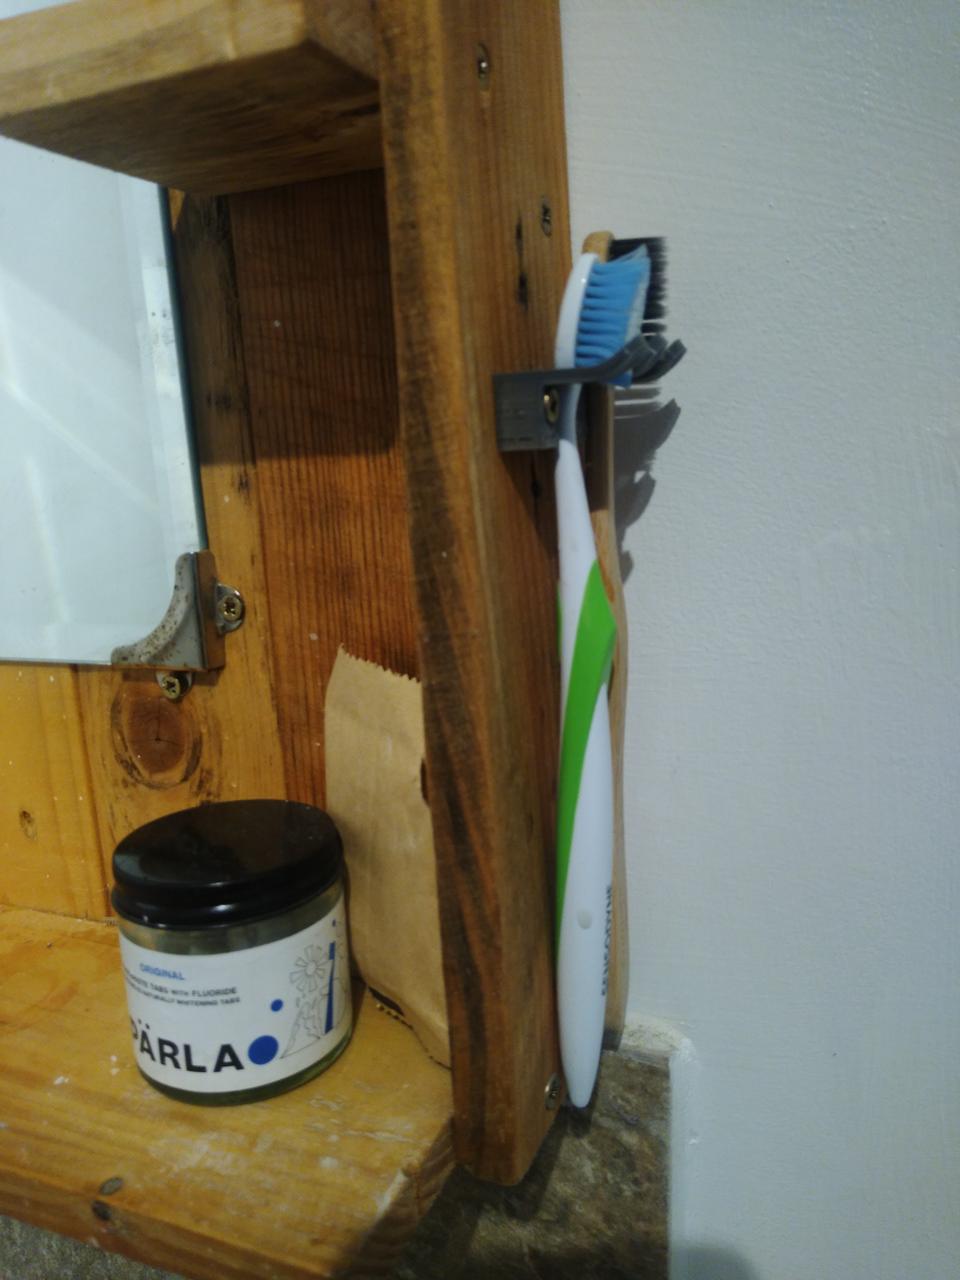

Not bad for about an hour's work - and no "iterations" either... however, the printer is up to it's tricks and blocking again, though this time it actually recovered, and the print is not perfect but the defects don't show too much, so I'm calling it "done". As if that ever means it's finiherd!
Auto-On Shop Vac Controller Update 2
Single 4700 MFD electrolytic capacitor fitted
My dad sent me a selection of electrolytic capacitors, which arrived yesterday. I swapped out the bank of three 1000 MFD caps for the largest he sent me, which was a 4700 MFD. I had to crop its legs to get it to fit, but it's now in place, tested and working - thanks, dad!
Tongue and Groove Reckoner app
Tongue and Groove Reckoner app
Tongue and Groove Reckoner app link
I wrote this little reckoner app to help with working out the height to set the tongue-and-groove router bit at for different thicknesses of wood, so I can use it on my phone in the workshop, but if you find it useful, you can use it too. It's written in Brython, a version of Python 3 that runs on web browsers - it kind of transpiles to Javascript, so it doesn't need a server on the back-end. Because it's using the theme CSS of MakerPunkBuzz, it should scale to work on mobile devices too. It doesn't log anything or send anything to any servers - the code and libraries used are coming right from my lil' RPi web server. You're free to use the code under the terms of the GPL3 License. You're free to modify it for your own needs, as long as you don't change the license or try to further restrict what other users can do with it.
Auto-On Shop Vac Controller Update 1
Manual Override Switch Fitted
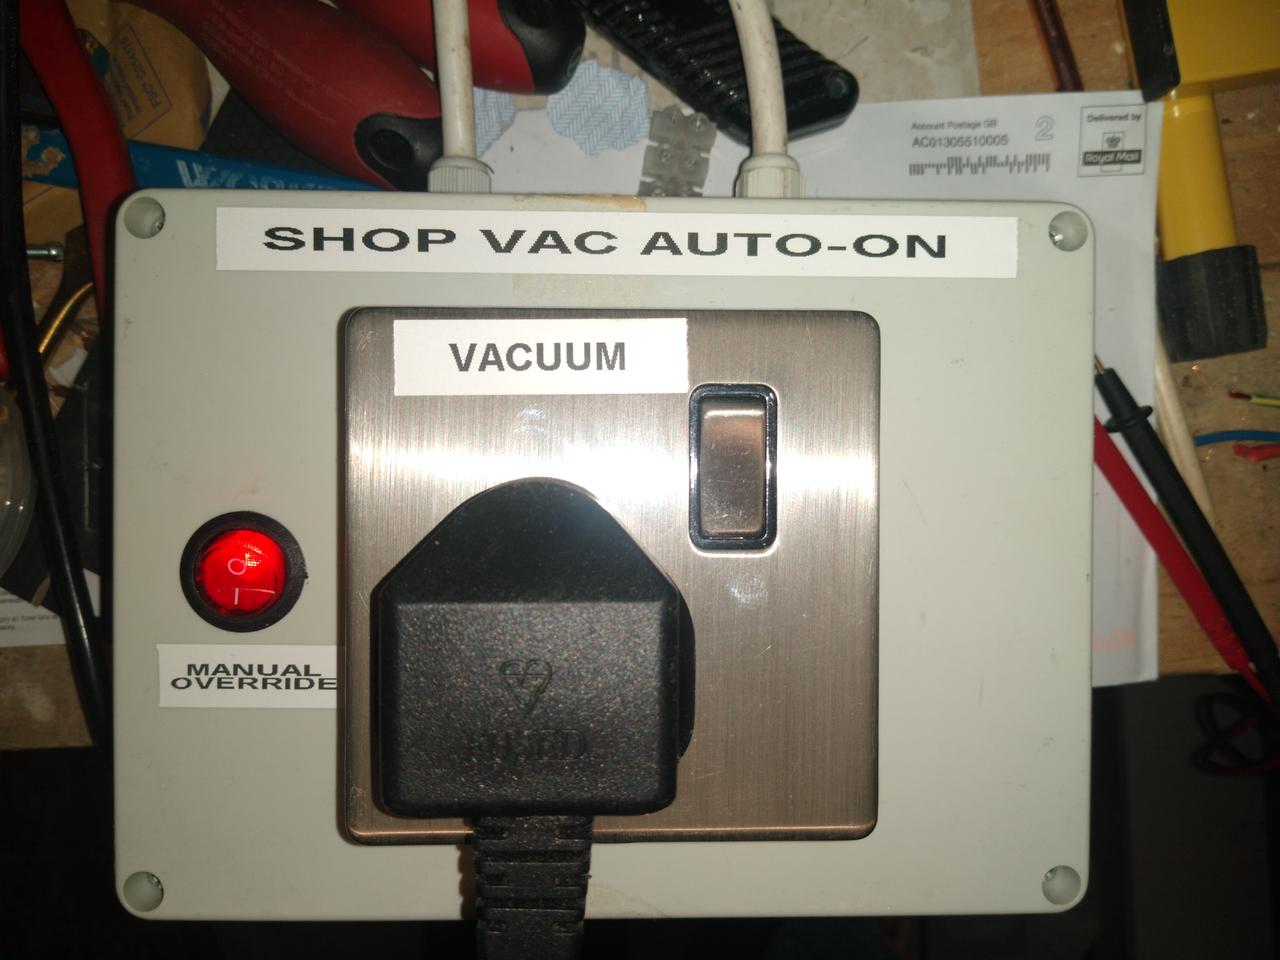
I ordered some illuminated 12V DC panel switches on Ebay a few days ago, so I could add the planned feature of a manual override. This is so that I can run the vac without having to start an attached tool. Well it arrived yesterday, and tonight I got round to wiring it in, and fixing it to the front panel of the project box.
These devices are pretty simple switches, but they have an added LED wired in inside, and an extra pin to control it. The extra pin of the LED is marked by the tag being brass plated instead of plain tin, so it's "gold" coloured. It's wired to the cathode of the LED, so you have to tie it to negative; the other two pins just work as normal, but they are polarised because how else would the LED come on when the switch is closed? The centre pin is the negative side, and the one on the opposite side to the gold pin is the positive.
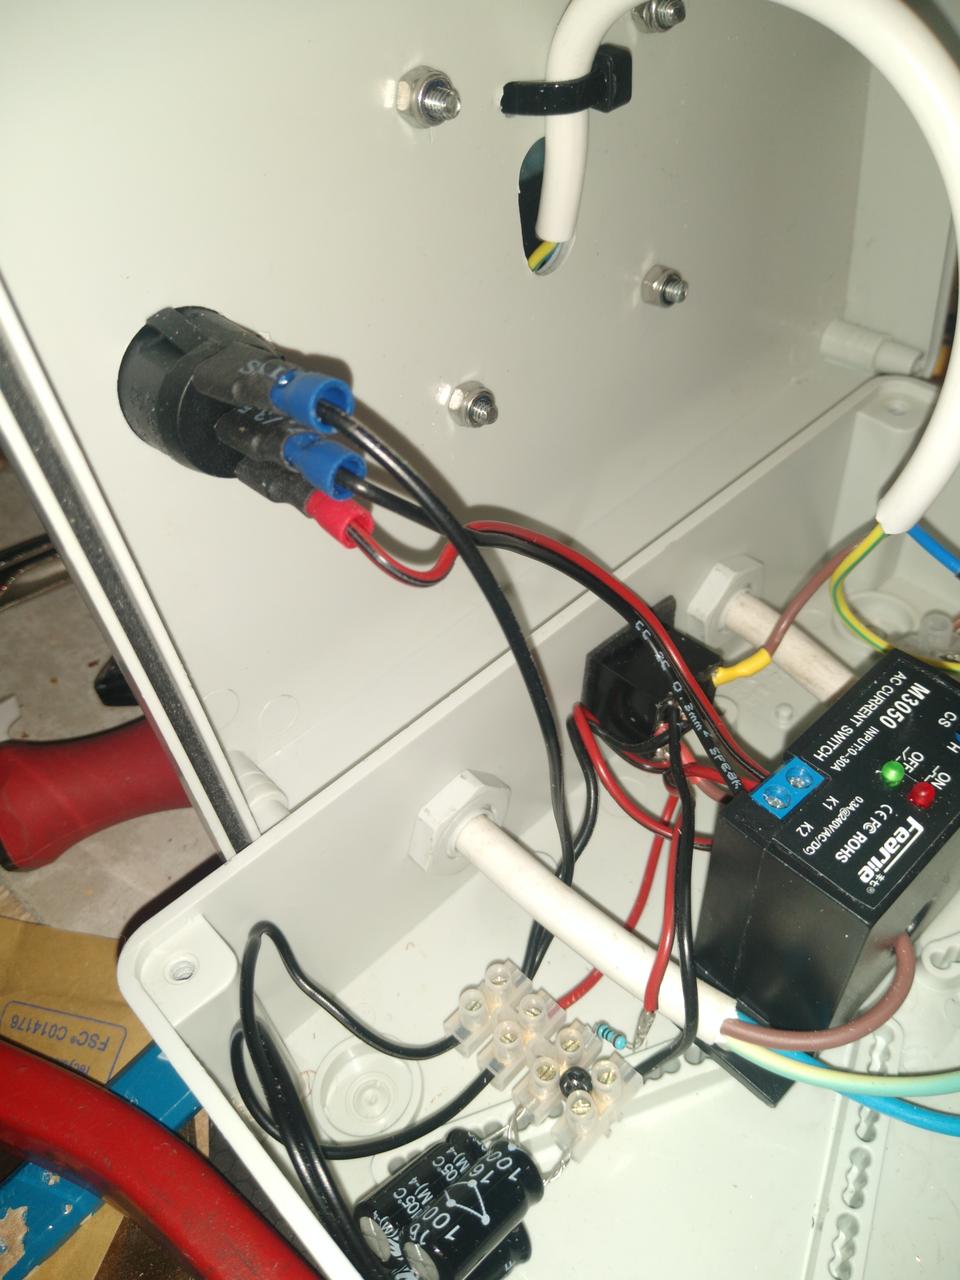
To make this work, I wired the switch pins across the AC Current Sensor's output pins - so when the switch is closed, it will bypass them, and drive the relay directly.
So now when I want to use the shop vac to suck up dust around the workshop, I don't have to unplug it from the controller! I call that a win.
Makita Router Plunge Adjuster
This adjuster fits onto the body of my Makita router which I use on my router table, to enable easy, fine control of the bit height/plunge depth. I used left-over materials I bought for another project.

Problem statement
It's really hard to make fine adjustments to a plunge router's bit depth when it's mounted on a router table. You have to fight against the plunge springs which are quite strong, and because it's upside down, you have to push doubly hard, which means making tiny adjustments is almost impossible. I need to be able to adjust the bit depth by fractions of a millimetre with ease, and after many frustrating attempts at manual techniques, I decided a gadget was the only way to go!
Inspiration
I've seen videos online of people using expensive fixed routers on router tables, and the ease with which they can adjust them. I have two routers - a new McAllister 1400W one which was about £55 from B&Q, and this old second hand Makita 860W one that I bought on Gumtree for £10, which is mounted on my router table. A DeWalt fixed router would cost me over £300, and I'd then need to buy a more expensive router table, which would have the built-in depth adjustment, for about another £300, and that's money I don't have.
Solution
I used a 100mm M6 coaching bolt, an M4 machine screw, nuts and washers, and a mending plate bent into a "curly L" shape. The machine screw mounts into the hole that the depth step turret used to be in, and the coaching bolt mounts via a short piece of 8mm aluminium tubing sandwiched on a steel L plate and some other bits of steel to grip the top of the router body. The coaching bold screws into an M6 dowel nut to adjust the height. The whole assembly is lashed to the top of the router with a hefty cable tie. There is a crank handle attached to the top of the coaching bolt to enable it to be easily turned to make adjustments - the knob came off the end of an old, broken precision screwdriver!
Tools used
- Vice - to hold the metal parts during cutting and forming
- Hacksaw - for cutting the metal parts to size and shape
- Drill press - for drilling holes and opening up existing hole to fit screws and bolts
- Metal files - for getting rid of those nasty burrs and sharp edges
- Hammer - to beat the mending plate into the required shape
Bill of materials
| Item | £Cost | Notes |
|---|---|---|
| 100mm M6 coaching bolt | £0.50 | Approx cost £2.50 for 5 at DIY stores |
| 40mm M4 machine screw | £0.10 | Approx cost £2.00 for 20 at DIY stores |
| 100mm mending plate | £2.00 | Approx cost £6.00 for 3 at DIY stores |
| Aluminium tube | £0.10 | Approx £4.50 per metre at DIY stores |
| Aluminium plate | £?.00 | Had this on hand as scrap |
| M2 nuts and bolts | £?.00 | Had these on hand from a bargain store selection box |
| Cable ties | £0.10 | From my big tub of 100's of cable ties I periodically refill |
Auto-On Shop Vac Controller
This controller switches on an attached vacuum when a power tool is in use. It's made with many found or "spare" components I already had on hand.
Problem statement
When I switch on a dust-making tool like a router or mitre saw, I want the vacuum-cleaner attached to the dust extraction port to come on automatically. It would be great if it stayed on for a while too, so that it clears the hose of lingering dust. I also want to be able to attach several tools to the controller so that I don't have to keep unplugging and replugging the mains leads. The vacuum hose can be reattached easily enough, however. I have developed a simple, resilient hose attachment using recycled plastic pop bottles, that I will document one day, that makes this easy and scalable.
Inspiration
I have a Parkside wet and dry shop vacuum that already has this feature, but I don't want to keep it attached to the dust separator all the time as it's useful for other things. I watched quite a few youtube videos, and read a few Instrucibles and blog posts by others who had already made one, and decided it was worth a shot. After talking it over with my dad - a retired Electronics Engineer and life-long maker, he came up with the idea of using an AC current-sensing module.
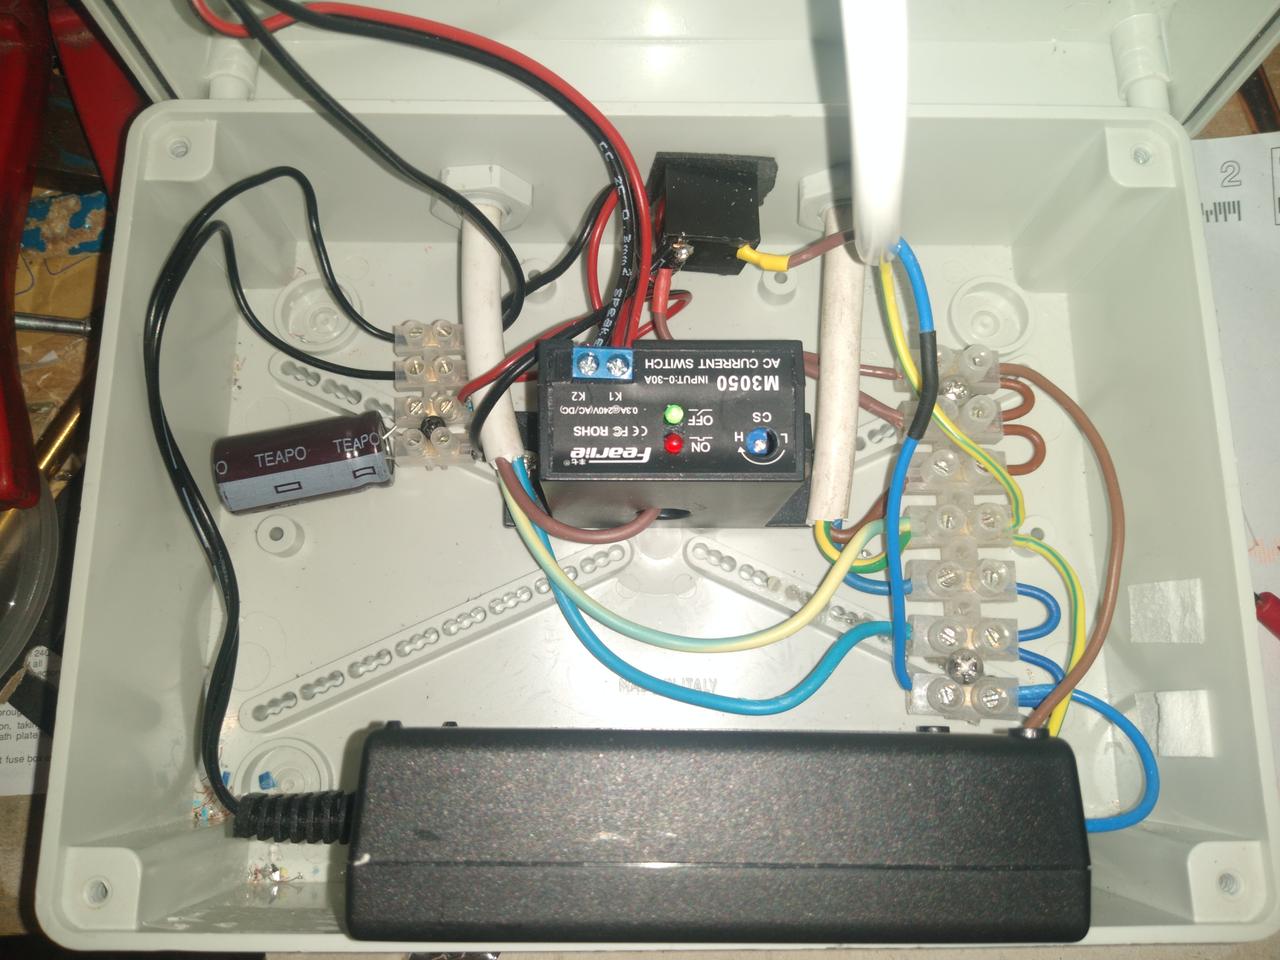
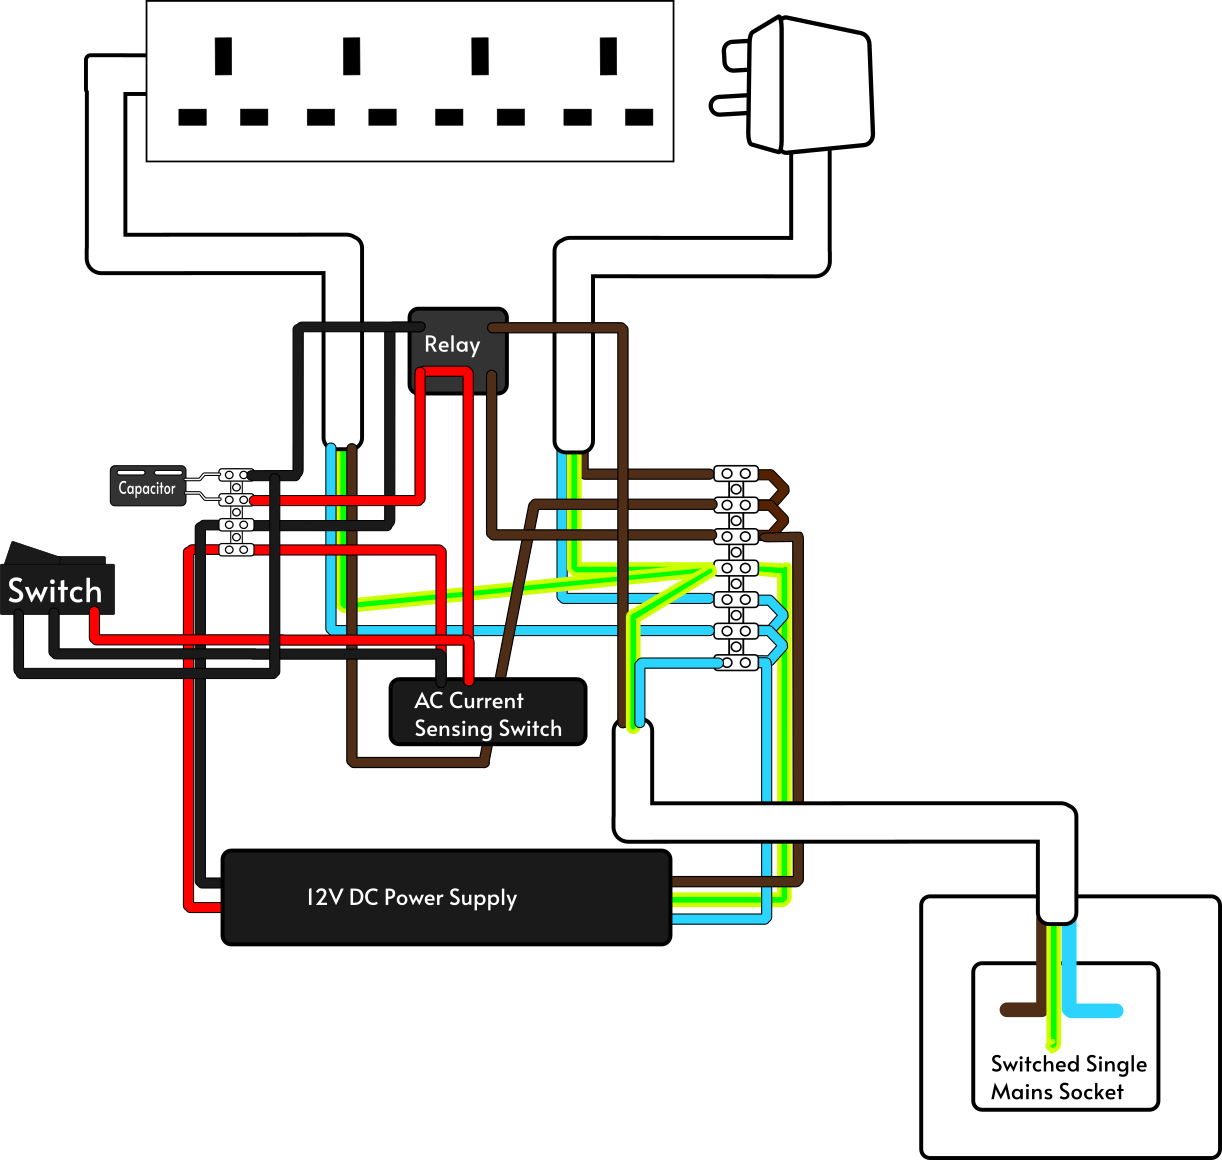
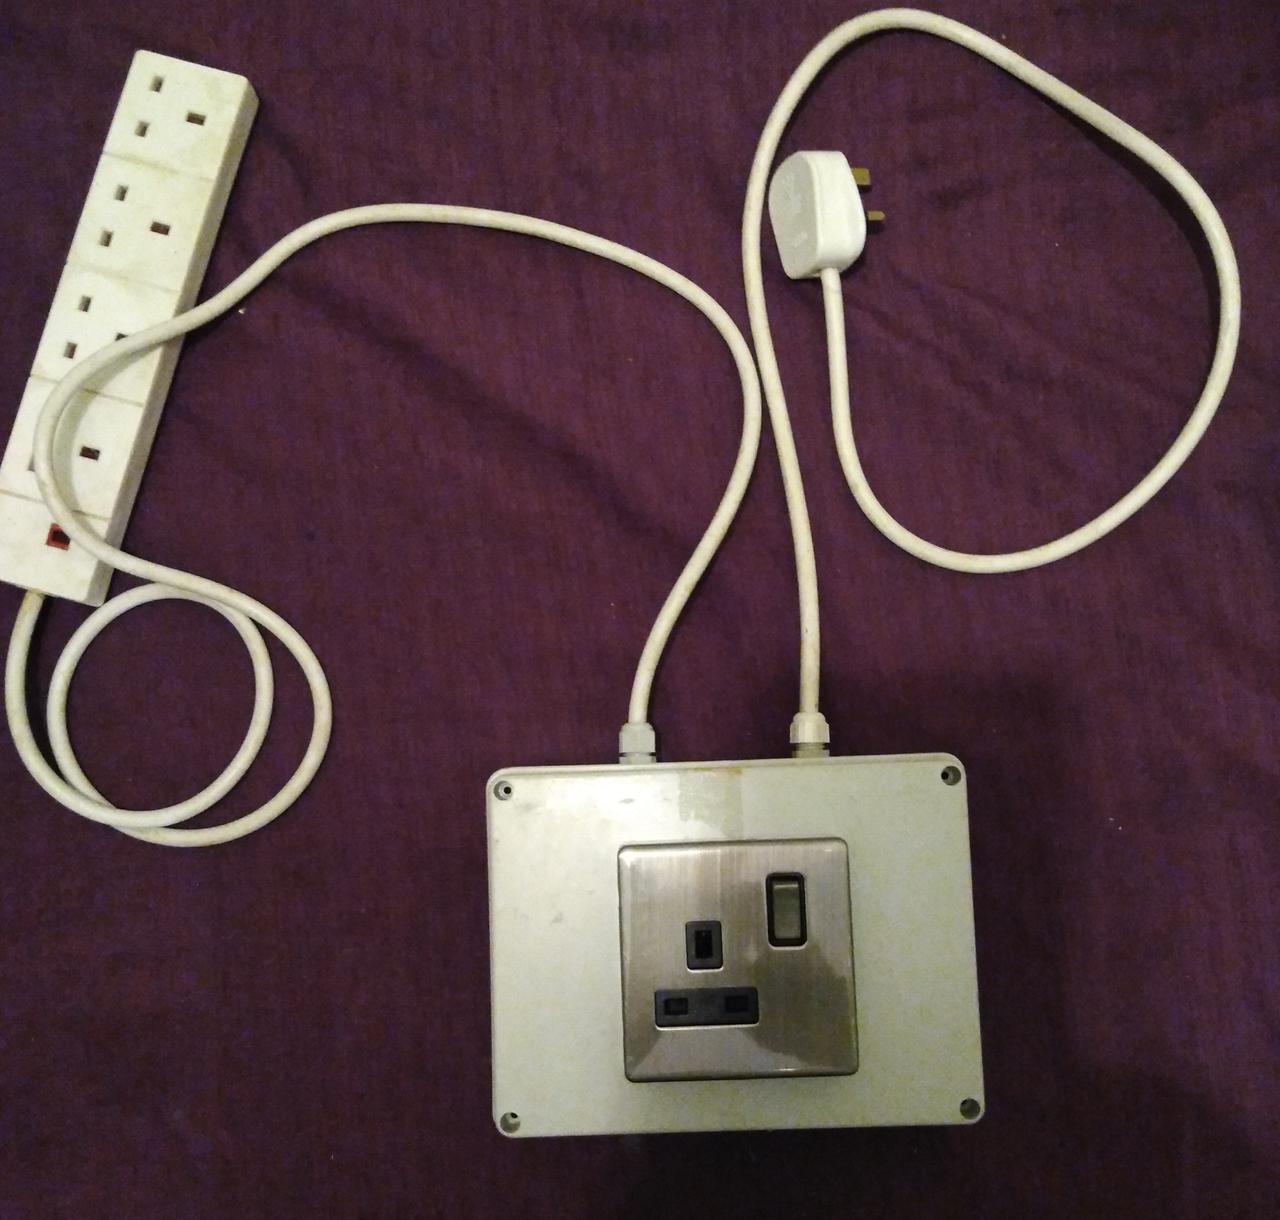
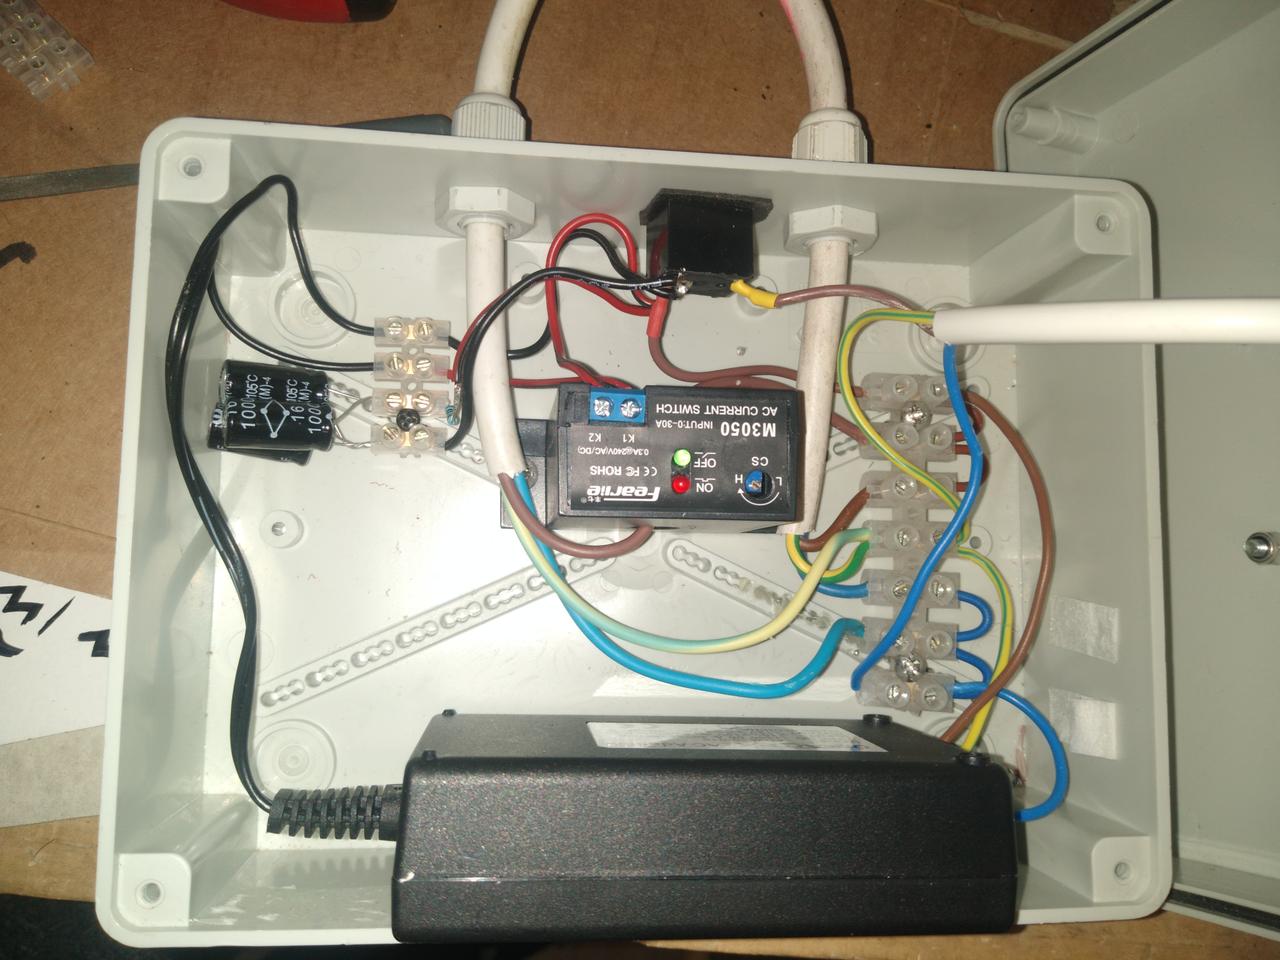
Solution
A scavenged project box, with a single mains socket mounted on the front to power the vacuum; Inside, is a repurposed 12 volt power supply, an AC current-sensing module, a relay and two terminal blocks. I used an old, but sturdy, 4-gang mains extension lead, and cropped the cable at about a metre from the plug. The section with the plug became the mains feed, and the 4-gang socket strip became the feed for the monitored tools. A bank of 3x 1000 microfarad electrolytic capacitors across the relay keep it energised for a few seconds after the triggering tool is turned off.
Bill of materials
| Item | £Cost | Notes |
|---|---|---|
| Project box | £0.00 | Dumpster dived about 10 years ago |
| 4-gang extension lead | £5.00 | Already had this on the shelf |
| Switched single mains socket | £1.00 | "Old new" from local charity shop |
| Low profile single back box | £1.50 | |
| AC current sensor switch M3050 | £8.59 | Purchased on Ebay |
| 3x 1000 μF electrolytic capacitors | £1.77 | Purchased on Ebay, 5 for £2.95 |
| Terminal blocks - 11 terminals | £~2.00 | Already had, but cheap to buy. DC terminals are smaller than mains ones |
| 12V 2A DC power supply | £?.00 | Free, recovered from junk pile years ago. Similar available on Ebay for approx £5.00 |
Wiring diagram

Additional Features to be added
- Swap out the 3 1000 MFD electrolytic capacitors for one larger one (my Dad says it's untidy as it is currently) - see update 2
- Add a manual-on switch so I can turn the vacuum on without powering a tool or unplugging and replugging it - see update 1
- An external indicator light maybe? - see update 1
Updates
- 2024-01-11 13:54 Auto-On Shop Vac Controller Update 2
- 2024-01-06 22:55 Auto-On Shop Vac Controller Update 1
New kitchen cabinets project
My wife, Michelle has been wanting to revamp our kitchen for quite a while, because the cupboard doors are getting rather worn and stained. They are laminated, and in several places where the doors and drawers bang against each-other, the top layer is wearing off. In some places, there are track marks where screws from doors are rubbing on the fronts of adjacent drawers, and in other places splashes that should be easy to clean off have left stains we can't get off. Anyway, after looking at the cost of a new kitchen, she's decided we can't afford this at the moment.
So, she's been looking through blog posts about people who have made upgraded their kitchens cheaply, and found some who have made them out of pallet wood. As I have made quite a lot of stuff out of pallets, she got to thinking... and inevitably, out comes the question:
"Could you make us a new kitchen out of pallet-wood?"
She showed me some pics - some were amazing, and others were... let's say, a bit shonky. Being the sucker I am, I replied in my best Jarvis Cocker voice, "I'll see what I can do", and then quickly added "but I'll need some tools...".
Now, as far as Michelle is concerned, I already have loads of tools... maybe more than I need, but she does accept that I save us a lot of money by doing things myself instead of paying someone to do it. "What do you need then, and how much will it cost?"
After doing some quick ebay searches, and a back-of-an-envelope calculation, I came up with "probably about £500" for a some power tools and miscellaneous bits and pieces. She agreed that this was significantly cheaper than the approximately £10,000 to £20,000 for a new kitchen, so I could go ahead.
It's obviously a long-running project - I'm going to have to learn how to use these tools, and get things set up in my workshop, and I'm going to have to build some of the tools too, because bought ones are way too expensive. I already have:
- Cordless and corded electric hand drills and drills/bits
- Compound mitre saw
- Bandsaw
- Electric plane
- Lots of manual hand tools
- Multi-tool/oscillating tool
- Recipricating saw
- Vice
- Workmate bench
So what do I think I need, and what do I think I'll use them for?
- Router - for trimming, grooving, forming joints and so on
- Router table - for things like tongue and groove, rounded edges and finishing edges
- Router dovetail jig - for making proper furniture joints
- Drill press - for drilling accurately at 90 degrees
- Thickness planer - for making consistent thickness planks from inconsistent pallet wood
- Table saw - for ripping pallet into consistent widths, though I can use the bandsaw for small quantities
- Dust extraction facility - something better than the vacuum I'm currently using
- Inevitably more things I haven't thought of yet
I'll break down how this is progressing in subsequent posts.
Trying out Nikola
I've decided to try documenting my makes, repairs and upcycling, so here we are.
There are a few constraints on how I want to do this:
- Self-hosted
- Served over my own broadband
- Served from my own hardware
- Static HTML
- Low learning curve
- Easy to add/edit posts
- Some kind of tagging/categorisation system
- Easy to change theme and layout
After a whole evening of searching, I arrived at Publii, a static HTML authoring app I'd not heard of before, and I spent the next day messing round with it. It has a nice, comfortable GUI, and seems to have a good community behind it. It supports MarkDown, has features to help you organise your content and categorise and tag it. I was very impressed, actually. Unfortunately, I wasn't able to get it to work consistently though - it seems rather buggy in its current version (0.44.3), with quite a few weird glitches and a few outright crashes and lock-ups, so I ended up deciding that I needed to have another look.
After another evening of further searching, I ended up back with Nikola, a GUI-less command-line tool that does quite a few of the things Publii does, and lots more besides, but without the snazzy graphical front-end. I've actually used it a bit in the past - about 5 years ago - and it seems to have matured well, and I was able to get further than I did with Publii, in less time, so here we go...
Let's see how this works out!